Managarm Handbook
Managarm is a pragmatic microkernel-based operating system with fully asynchronous I/O.
This documentation contains conceptual and technical details for various parts of the system and different guides.
The Official Discord server can be found here: https://discord.gg/7WB6Ur3.
What is this about? - from the managarm README.
This is the main repository of managarm, a microkernel-based operating system.
What is special about managarm? Some notable properties of managarm are: (i) managarm is based on a microkernel while common Desktop operating systems like Linux and Windows use monolithic kernels, (ii) managarm uses a completely asynchronous API for I/O and (iii) despite those internal differences, managarm provides good compatibility with Linux at the user space level.
Aren't microkernels slow? Microkernels do have some performance disadvantages over monolithic kernels. managarm tries to mitigate some of those issues by providing good abstractions (at the driver and system call levels) that allow efficient implementations of common user space functionality (like POSIX).
Is this a Linux distribution? No, managarm runs its own kernel that does not originate from Linux. While the managarm user space API supports many Linux APIs (e.g. epoll, timerfd, signalfd or tmpfs), managarm does not share any source code (or binaries) with the Linux kernel.
Getting Started
This section of the Managarm Documentation shows how to get into Managarm.
I want to try out Managarm
If you want to try out Managarm without building the system yourself.
I want to contribute to Managarm
If you want to contribute to Managarm or develop for it.
Trying out managarm
The Managarm project provides nightly builds of managarm if you want to try out Managarm without setting up the development environment and building the whole OS yourself.
Nightly builds
The latest nightly build can be downloaded here.
Our build server, named xbbs, the xbstrap build server, which builds all of our packages automatically can be viewed at https://builds.managarm.org.
Running the nightly builds manually
Before running the downloaded nightly build you have to uncompress it.
To run the nightly builds we recommend using QEMU with the following options:
qemu-system-x86_64 -enable-kvm -m 2048 -cpu host,migratable=off -device qemu-xhci -device usb-kbd -device usb-tablet -drive id=hdd,file=image,format=raw,if=none -device virtio-blk-pci,drive=hdd -vga vmware -debugcon stdio
Be aware that the -enable-kvm flags works only on systems that support KVM.
If you boot into kmscon (the non graphical environment), or if you issue login from any shell, use the following default credentials to log in.
For the root user, username: root, password: toor.
For the Managarm user, username: managarm. password: managarm.
Running nightly builds with extra tooling
We have some extra tooling as part of our bootstrap-managarm repo that may be useful to you. In order to easily obtain an image, you might want to set up a build directory, but download the image instead of building it yourself.
In order to do this, follow the setup steps from the handbook up to the xbstrap init command. After that, you can use xbstrap run get-nightly-image to pull the nightly image, or xbstrap run get-stable-image for the stable one.
In order to run it with our default QEMU configuration, you can use xbstrap run qemu. If you want to use a different configuration when booting managarm, you can use our vm-util.py script. Feel free to explore its options:
../src/scripts/vm-util.py qemu --help
Supported Hardware and Software
Software
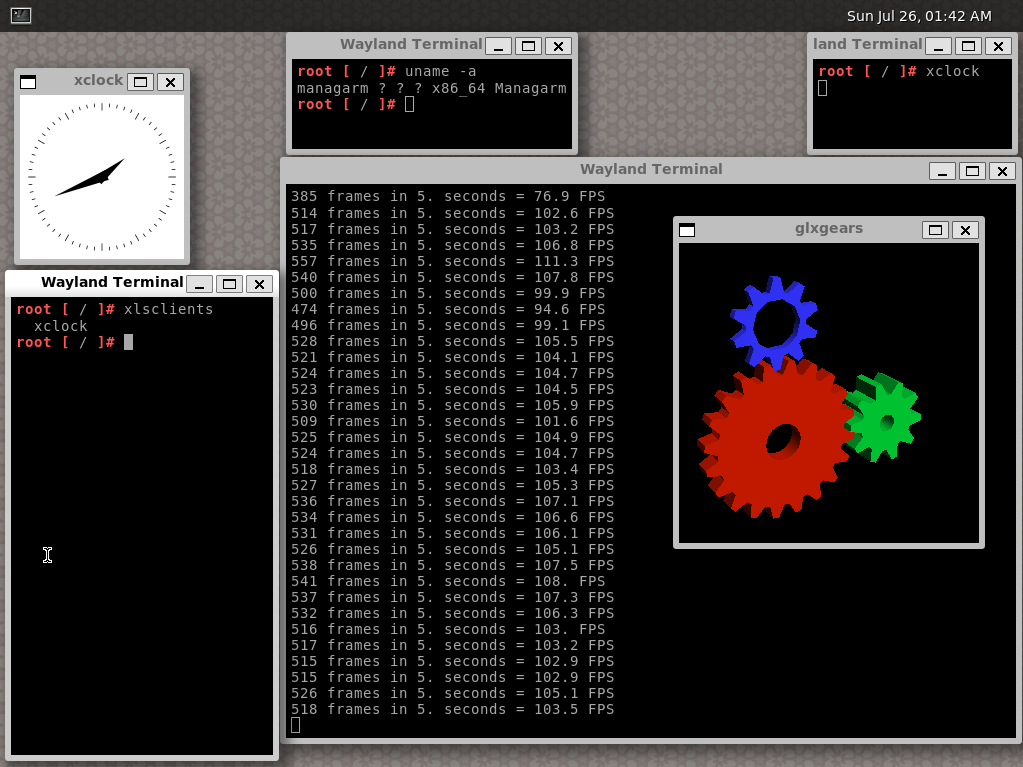
Programs supported on managarm include Weston (the Wayland reference compositor), kmscon (a system console), GNU coreutils, bash, nano and others.
A list of packages is available on our repo. A quick overview of various categories can be found at package list.
Hardware
Real Hardware
- General: USB (UHCI, EHCI, XHCI)
- Graphics: Generic VBE graphics, Intel G45, nVidia (Turing and later)
- Input: USB human interface devices, PS/2 keyboard and mouse
- Storage: USB mass storage devices, NVMe, AHCI, ATA
- Network: USB CDC ECM/NCM ethernet devices, USB MBIM cellular modems, RTL8168 family, Intel Gigabit Ethernet devices
- Serial: UART, CP2102 (USB to UART), FTDI FT232 (USB to UART)
Virtual Hardware
Includes all of the hardware listed above
- Graphics: virtio GPU, Bochs VBE interface, VMWare SVGA
- Storage: virtio block
- Networking: virtio net
Supported packages
For an always up-to-date package list please look here.
Managarm uses xbps for it's package management, users can use this to fetch packages from within managarm.
Some of the available packages include:
- Unix tools:
grep,sed,coreutils,diffutils,findutils,gawk,file,man-db,tar,which,groff,less,bzip2,gzip,xz-utils,lz4,zstd,bat,ripgrep,eza - Development:
yasm,nasm,patch,make,m4,gcc,cmake,binutils,bc - Scripting:
perl(only basic functionality),python,lua - Games:
ace,mednafen,tyr-quake,gtklife,nyancat,libremines,openttd - Networking:
wget,curl,socat,rsync,netcat - Communication:
hexchat,konversation - Editors:
nano,vim - Shells:
bash,dash,zsh - Graphical:
weston,mesa-demos,gtk+3,xclock,xkill,xwininfo,gtk4 - Browsers:
minibrowser,links - Databases:
sqlite,gdbm - Bootloaders:
limine - Emulation:
qemu - Office tools:
kcalc,gnome-calculator - Init system:
systemd
Building Managarm
This guide shows how to build a managarm distribution from source utilising the bootstrap-managarm patches and build scripts.
Building a managarm distribution from source
Build environment
To make sure that all build environments work properly, it is recommended to setup a build environment with our lightweight containerized build runtime cbuildrt (see below for instructions). It is also possible to build with Docker (see here), or by installing the dependencies manually (see here), but these methods are no longer recommended.
Make sure that you have at least 20 - 30 GiB of free disk space.
Preparations
- Create a directory which will be used for storing the
source and build directories. Here we use
~/managarm, but it can be any directory.mkdir ~/managarm && cd ~/managarm - Install the
xbstrapbuild system viapip3, as well as they4DSL:pip3 install xbstrap y4 - The
git,subversionandmercurialtools are required on the host (whether you build in a container or not). Install these via your package manager. - Clone this repository into a
srcdirectory and create abuilddirectory:git clone https://github.com/managarm/bootstrap-managarm.git src mkdir build
Creating a cbuildrt environment
-
Download and install the latest
cbuildrtrelease by running:xbstrap prereqs cbuildrt xbpsNote: If you choose to build
cbuildrtfrom source, make sure to place the resulting binary either in$PATHor in~/.xbstrap/bin. -
Download and unpack the latest Managarm
rootfssomewhere:curl https://repos.managarm.org/buildenv/managarm-buildenv.tar.gz -o managarm-rootfs.tar.gz tar xvf managarm-rootfs.tar.gz -
Inside the
builddirectory, create a file namedbootstrap-site.ymlwith the following contents:auto_pull: true pkg_management: format: xbps container: runtime: cbuildrt rootfs: /path/to/your/rootfs uid: 1000 gid: 1000 src_mount: /var/lib/managarm-buildenv/src build_mount: /var/lib/managarm-buildenv/build allow_containerless: trueNote: you must keep the
src_mountandbuild_mountvalues as shown above if you want to be able to use pre-built tools from our build server. These paths refer to locations on the container, not on your host machine. Also note that these paths cannot be changed after starting the build; doing so will likely result in a broken directory tree. -
In the
build/bootstrap-site.ymlfile you just created, replace thecontainer.rootfskey with the path to yourrootfs. -
If you want this build directory to be used for building for an architecture other than the default (x86_64), you can define the
archandarch-tripleoptions. For instance, if you want to build forriscv64:define_options: arch: riscv64 arch-triple: riscv64-managarm rust-arch: riscv64gcNote: Every build directory only builds for the one architecture specified by the options. If you want to build managarm for multiple architectures, set up a build directory for each architecture desired.
Building
-
Initialize the build directory with
cd build xbstrap init ../src -
Decide which software you want to include in the image you create. There are several meta-packages available which help you decide this:
base: just enough to boot intokmsconplus some functional commands to play with (such aslessandgrep)base-devel: same asbaseplus some extra development tools (such asgccandbinutils)weston-desktop: full managarm experience with a selection of terminal and GUI software
You can install these meta-packages by doing:
xbstrap install weston-desktopThis command will download binary packages from our build servers.
-
In order to rebuild parts of the system locally (e.g., after making changes to the source code), use the
--rebuildflag:xbstrap install --rebuild managarm-system managarm-kernel mlibc mlibc-headers
Creating Images
After managarm's packages have been built, building a HDD image of the system is straightforward.
For all methods, the image creation and updation commands shown below require the following programs to be installed on the host:
rsync, losetup, sfdisk, mkfs.ext2, mkfs.vfat. Refer to image_create for more details on this.
-
Decide what method you want to use to copy files to the image:
- Using libguestfs (the default method). We recommend this when root access is not possible or desirable. However, it is much slower than method 2 and requires some setup on the host (see below).
- Using a classic loopback and mount (requires root privileges). We recommend this when root access is acceptable because it is the fastest method and most guaranteed to work.
- Via Docker container (only works with the Docker build method). This is handy in case the user is in the
dockergroup since it does not require additional root authentication. We discourage this because it usesdocker run --privileged(which is not safer than giving root access) and currently has some bugs.
Going with method 1 will require
libguestfsto be installed on the host. After installinglibguestfs, if you encounter errors while making the image it might be necessary to run the following:sudo install -d /usr/lib/guestfs sudo update-libguestfs-appliance -
Add the following to
build/bootstrap-site.yml, depending on what mount method you have chosen:define_options: mount-using: 'loopback' # or guestfs/docker -
Create the image:
xbstrap run initialize-empty-image -
Copy the system onto it:
xbstrap run make-image -
Launch the image using QEMU:
xbstrap run qemu # Note that you can combine the last two operations: xbstrap run make-image qemu
Alternatively, you can call the necessary scripts manually (check their help messages for more information):
../src/managarm/tools/gen-initrd.pyand../src/scripts/update-image.pyfor copying the files onto the image (the mount method can be selected with the--mount-usingargument)../src/scripts/vm-util.py qemufor launching QEMU
Building with Docker
This section explains how to build Managarm in a Docker environment.
Note: we recommend using
cbuildrtinstead of Docker as it is faster, requires less privileges and is better tested (we usecbuildrton our continuous integration build server, so breakages are more noticeable).
- Complete the Preparations section.
- Install Docker.
- Build a Docker image from the provided Dockerfile:
docker build -t managarm-buildenv --build-arg=USER=$(id -u) src/docker - Create a
bootstrap-site.ymlfile inside thebuilddirectory containing:
Thiscontainer: runtime: docker image: managarm-buildenv src_mount: /var/bootstrap-managarm/src build_mount: /var/bootstrap-managarm/build allow_containerless: truebootstrap-site.ymlwill instruct our build system to invoke the build scripts within your container image.
Now proceed to the Building section.
Building without containers
This section explains how to build Managarm with manual installation of the build dependencies.
Note: we recommend using
cbuildrtas it provides a clean build environment separate from your host machine, so issues are less frequent and easier to reproduce. It also allows you to use pre-built tools from our build server rather than compiling everything from source.Be aware that not only missing dependencies can impact the build process: some ports might incorrectly detect optional dependencies from the host operating system. Since it is infeasible to test all possible combinations of host packages, support for building outside of containers is not a priority of the project.
- Complete the Preparations section.
- Certain programs are required to build managarm; to get a list of the corresponding Debian packages we refer you to the Dockerfile.
mesonis required. There is a Debian package, but as of Debian Stretch, a newer version is required. Install it from pip:pip3 install meson- For managarm kernel documentation you may also want
mdbook. You can install it from your distribution repositories, or using cargo:cargo install --git https://github.com/rust-lang/mdBook.git mdbook
Now proceed to the Building paragraph.
Updating Packages
This section describes how to keep an existing Managarm build up to date after upstream repositories have merged changes.
Updating system packages
To keep up with updates of Managarm's kernel and drivers,
it is usually enough to keep the packages managarm-kernel,
managarm-system, mlibc and mlibc-headers up to date.
If you have local changes to these system packages, it is usually
advisable to update the packages via git
(see the following section).
In other cases, xbstrap can be used to update these packages using the command:
xbstrap install -u --deps-of managarm-system --deps-of managarm-kernel --deps-of mlibc mlibc-headers
It is important to update
mlibc-headerswhenmlibcmodifies its public headers. Ifmlibc-headersis out of date,mlibcwill still build fine but ports will not see any updates in C library headers.
Updating via git (or other version control tools)
xbstrap manages source repositories by using each package's upstream
version control tool. In most cases, upstreams use git (although hg and svn are
also supported by xbstrap). To update a package via git (or any other VCS),
simply pull a new revision of the package and use xbstrap to rebuild it.
For example, pulling a new revision of the managarm repository
and rebuilding the managarm-system and managarm-kernel packages
can be achived via:
cd ~/managarm/src/managarm
git pull origin master
cd ~/managarm/build
xbstrap install --rebuild managarm-system managarm-kernel
Note: When updating packages through VCS, make sure to also keep their dependencies up to date. For the system packages mentioned above these dependencies include
frigg,libasync,libsmarter,fafnirandlewis.
Updating ports
Updating ports via xbstrap works similarly as updating system packages.
However, ports usually build from fixed versions (and not from branches).
If local changes have been applied to such a fixed version
(e.g., by patches), xbstrap refuses to
automatically check out a different commit,
as doing a git checkout (or similar) would risk loss
of local commits and/or uncommitted changes.
To override this behavior, pass --reset to discard
local commits (or --hard-reset to discard uncommitted changes and local commits).
For example, to update bash, run
# Do a dry-run first. Make sure to verify that no local changes would be discarded.
xbstrap install -u -n bash
xbstrap install -u --reset bash
Note: It is safe to use
--resetto remove patches that have been applied byxbstrapitself. However, care should be taken to not update repositories with important local modifications that you have applied yourself.In case of
git, local commits can usually be recovered after--resetby inspectinggit reflog; uncommitted changes that are discarded by--hard-resetcannot easily be restored.
Contributing
This section of the Managarm documentation helps you on contributing to Managarm.
Communication
Discord
Most of our communication happens on our Discord at https://discord.gg/7WB6Ur3.
GitHub
Some of our communication takes place on GitHub at https://github.com/managarm/managarm.
IRC
We also have an IRC channel #managarm on irc.libera.chat, please keep in mind that our former channel found on freenode is no longer in use.
Contributing to The Managarm Project
First off, thanks for taking the time to contribute! ❤️
All types of contributions are encouraged and valued. See the Table of Contents for different ways to help and details about how this project handles them. Please make sure to read the relevant section before making your contribution. It will make it a lot easier for us maintainers and smooth out the experience for all involved. The community looks forward to your contributions. 🎉
Table of Contents
I Have a Question
Our primary way of communication is our Discord server, please don't hesitate to ask a question there, we are more then willing to help. We also use GitHub Issues. You can search here to see if a question has already been answered before.
How do I contribute?
Legal Notice
When contributing to this project, you must agree that you have authored 100% of the content, that you have the necessary rights to the content and that the content you contribute may be provided under the project license.
Reporting Bugs
Submitting a Bug Report
A good bug report shouldn't leave others needing to chase you up for more information. Therefore, we ask you to investigate carefully, collect information and describe the issue in detail in your report. Please complete the following steps in advance to help us fix any potential bug as fast as possible.
We use GitHub issues to track bugs and errors. If you run into an issue with the project:
- Open an Issue. (Since we can't be sure at this point whether it is a bug or not, we ask you not to talk about a bug yet and not to label the issue.)
- Explain the behavior you would expect and the actual behavior.
- Please provide as much context as possible and describe the reproduction steps that someone else can follow to recreate the issue on their own. This usually includes your code. For good bug reports you should isolate the problem and create a reduced test case.
- Collect information about the bug:
- Your input and the output
- Can the bug be reproduced with the latest nightly image and/or with current packages from our package repositories?
Your First Code Contribution
This section of the Guide is Work-In-Progress. Please come back later for more information.
For instructions on how to setup the build environment, how to build and how to run Managarm we refer you to the bootstrap-managarm repository here.
There is also the option to set up LSP support.
Preparing a PR
When preparing your work for a PR, keep a few things in mind:
-
Split your PR into reasonably small commits. Each commit should address one specific concern. Pick sensible and informative commit messages (see also "Commit Messages").
-
Commits must be self-contained. Each commit must build on its own (such that
git bisectworks as expected). -
Pick a descriptive branch name. The branch name appears in merge commits and is visible in the commit history.
-
When you apply changes after code review, do not include fixes of early commits as separate commits in your PR. Instead, amend your earlier commits to include the fixes. Force push the amended commits to your branch.
git commit --fixup <commit>+git rebase -i --autosquash origin/masterare excellent tools to amend commits, regardless of where they appear in a patch series.For the purposes of adding fixes to address reviews, it is advisable to not squash the fixup commits but to simply push them to the PR branch - this allows reviewers to trivially see the changes made, and the fixups can then still be squashed before merging.
-
Do not include merge commits in your PR ("Merge branch master ..."). Managarm strives for a linear (or almost linear) commit history on all repositories.
Merge commits can accidentally be created by running
git pull origin masteraftermasterandorigin/masterhave diverged. This can be avoided by passing the--rebaseoption togit pull. We strongly recommend to setgit config --global pull.rebase trueto make--rebasethe default. -
Signing your commits is optional, but welcome.
-
Feel free to use
Co-authored-by:lines for co-authors of the commit.
Handling bootstrap-managarm and managarm dependencies
Sometimes, a situation can arise where changes to both the managarm/managarm repo and managarm/bootstrap-managarm are needed. If these changes depend on each other, our GitHub Actions jobs may fail for managarm. This is obviously suboptimal, as we would like to ensure that a PR builds correctly even if, and especially if, it depends on bootstrap-managarm changes.
In order to fix this, you can specify a bootstrap-managarm PR that the GitHub Actions jobs for managarm should build against. In order to do this, include the following line as a separate line (as in, it should be at the beginning of a line) in your PR description body:
Depends on managarm/bootstrap-managarm#<PR>.
Obviously, replace <PR> with your PR number.
Improving The Documentation
This section of the Guide is Work-In-Progress. Please come back later for more information.
Styleguides
Coding Style
For the general coding style used in The Managarm Project we refer you to the coding style.
Commit Messages
For the general commit message style used in The Managarm Project we refer you to the commit message style.
Attribution
This guide is based on the contributing-gen. Make your own!
xbstrap-Workflow
After modifying the source code, xbstrap is usually used to recompile Managarm's packages
and to run the resulting image in a virtual machine (such as qemu).
This section gives a quick overview of useful xbstrap subcommands
that are utilized to develop Managarm.
Rebuilding packages
Changes to Managarm almost always involve the packages managarm-kernel,
managarm-system (which contains drivers and servers),
mlibc (our C library), or mlibc-headers (which must be rebuilt after
changing public mlibc headers).
xbstrap can be used to rebuild these packages
using
xbstrap install --rebuild managarm-system
(and similarly for packages other than managarm-system).
After rebuilding a package, the make-image step needs to be invoked again
to update the disk image
(see the section on building Managarm of this handbook):
xbstrap run make-image
# Or `xbstrap run make-image qemu` to also run the image in qemu.
Sometimes, it can become necessary to re-run the configure scripts
of ports (or Meson/CMake). This is usually the case if build scripts
and/or configuration files have changed in ways that the build
system does not anticipate. Invoking the configure step again
is done via:
xbstrap install --reconfigure managarm-system
LSP setup
With cbuildrt>=0.1.2 and xbstrap>=0.26.0, it is now possible to run clangd server inside the build context. This provides autocompletion, hover information, basic refactoring and other features to your text editor of choice.
As the server runs inside a container or within a modified environment, which is a nonstandard configuration, some editor configuration will be required.
Common setup
Using the scripts/managarm-lsp-launcher.sh script in the bootstrap-managarm
repository, we can conveniently launch an LSP server in our build environment.
This script discovers what package context you're currently in and runs clangd
appropriately.
It relies on the compile_commands.json link to figure out what package you're
currently in.
To create this link, run:
xbstrap -C /path/to/build-dir lsp <package> -- ln -s @THIS_BUILD_DIR@/compile_commands.json
For instance, if <package> is managarm-system, it will place a link in
<source dir>/managarm/compile_commands.json, as this is where the xbstrap
managarm source is located.
Note on "multi build" sources
Some code, such as the managarm kernel and servers, is built under two
distinct configurations from the same source.
For these, the above procedure will not be sufficient (which one of the two
compile databases do you pick?).
As a workaround, we can instruct clangd to conditionally pick a compile
database.
In the managarm source directory, drop in a snippet like this one into a file
called .clangd at the root:
---
CompileFlags:
  CompilationDatabase: /var/lib/managarm-buildenv/build/pkg-builds/managarm-system
---
If:
  PathMatch: kernel/.*
CompileFlags:
  CompilationDatabase: /var/lib/managarm-buildenv/build/pkg-builds/managarm-kernel
---
If:
  PathMatch: kernel/eir/boot/uefi/.*
CompileFlags:
  CompilationDatabase: /var/lib/managarm-buildenv/build/pkg-builds/managarm-kernel-uefi

# vim: set ft=yaml :
Your paths might vary, and the LSP launcher relies on a compile database link
existing (even if broken), so the above step with ln -s is still necessary.
Editor specific setup
vim (vim-lsp)
To configure vim-lsp, we recommend using a conditional on your working directory based in your Vim startup file:
if executable('xbstrap') && getcwd() =~ '/path/to/bootstrap-managarm/.*'
    au User lsp_setup call lsp#register_server({
        \ 'name': 'xbstrap-lsp-managarm',
        \ 'cmd': {server_info->['/path/to/managarm-lsp-launcher.sh', '/path/to/managarm/build/']},
        \ 'whitelist': ['c', 'cpp', 'objc', 'objcpp'],
        \ })
endif
GNU Emacs (eglot)
In GNU Emacs, you can use directory local variables to adjust Eglot in your clone of Managarm alone, by placing a file like the following into it:
;;; Directory Local Variables            -*- no-byte-compile: t -*-
;;; For more information see (info "(emacs) Directory Variables")

((nil . ((eglot-server-programs
          . (((c-mode c++-mode) . ("/.../managarm-lsp-launcher.sh" "/.../build"))
)))))
Which translates, roughly, to: for each file in this project, associate
c-mode and c++-mode with managarm-lsp-launcher.sh. This is done like so
in order to have consistent Eglot variables across the entire project.
VSCodium (LLVM clangd)
The LLVM clangd plugin allows you to change the path to clangd. We can use this to launch our wrapper:
{
    "clangd.path": "/path/to/managarm-lsp-launcher.sh",
    "clangd.arguments": ["/path/to/managarm/build/"],
    "clangd.onConfigChanged": "restart"
}
Troubleshooting
In case of trouble, please invoke the script directly like so:
/path/to/managarm-lsp-launcher.sh path/to/build; echo "$?"
- If the script exits with no output and exit code
1, your build directory is incorrect. - If the script exits with no output and exit code
2, there is nocompile_commands.json. - If you see the
clangdbanner, but you are seeing issues in the editor, enable the LSP logs in your editor (for instance,g:lsp_log_verboseandg:lsp_log_filewithvim-lsp), and check the logs. - Export
CLANGD_FLAGS="--log=verbose"before running your text editor to increase log verbosity and try again. - LLVM 13 changed the meaning of
.clangd. It used to be a directory containing the indexer cache, but it was moved to$XDG_CACHE_HOME/clangd. If.clangdis a directory, remove it. - If there is no obvious solution, reach out for help.
Commit messages
This section of the Managarm documentation describes the commit message conventions that we use.
General
For commit messages we usually write something like this:
<module>: <A sentence describing what was changed>
If the intent or implementation are not immediately obvious, the commit should include an explanations of what is done. Of course, we expect to see this in any pull request too.
Modules
We use modules to describe where in the system the change is made. For the Managarm repo, we use the following modules:
thor, optionally followed by a subsystem or arch, likethor/pciorthor/x86. This is used for changes to the main kernel of Managarm, thor.eir, optionally followed by a architecture, likeeir/x86. This is used for changes to Managarm's prekernel, eir.posix, used for everyting in the posix emulation layer.docs, used when updating the documentation, like the one you are reading now!core/<submodule>, submodule can be eitherdrmorvirtioat the time of writing. This is used for everything related to the core of the DRM interface or virtio handling.drivers/<drivername>, where the driver name is the driver being worked on, likedrivers/libblockfsfor example. This is used for everything driver related.hel, used for everything related to the hel and helix syscall api.mbus, used for everything related to mbus.protocols/<protocol>, where protocol is the protocol that is being changed. This is used for every protocol change made.netserver, used for every change to the network server.tests, used when working on the testsuites.tools/<toolname>, used when working on the tools that the Managarm repo has, currentlyanalyze-profile,gen-initrd,bakesvrandostrace.utils/<utilname>, used when updating various utilities that reside in this repo, currentlylsmbusandrunsvr.build, used when editing the meson.build file.meta, used for meta changes, for example a readme update..github, used when modifying files found in the.githubdirectory.
Commit messages in the bootstrap repo
For bootstrap-managarm, the commit message usually follows the same convention as the main repo, but there are different modules there. As we're using the Gentoo style of package separation with the file names (sys-apps.yml for example), we use that as a module designator too in some cases. For your use, we've listed the used modules down below:
<port name>, when making changes to a port, we use the name of the port as a module specifier.host-<tool name>, when making changes to host tools used during the build.<gentoo package category>, where the category is something likesys-apps(see here for more examples). This is only used when moving ports around.docker, used when updating theDockerfile.meta, used for meta changes, for example a readme update.ci, when making changes to the ci scripts that reside in this repo..github, used when modifying files found in the.githubdirectory.
There are two exceptions on the commit messages used in this repo, namely when adding a new port and when updating a port. When adding a new port the following message is used:
<package name>: Add port
And when updating a port the following message is used:
<port name>: Update from <old version> to <new version> <optionally, if it fixes severe security vulnerabilities, list them here, for example by listing their CVE number> <optionally, if there have been other changes to the build recipe, like new configure flags, list them here>
Coding standard for The Managarm Project
The Managarm Project follows the following coding standard.
Managarm-specific Guidelines
This section lists the most important coding style guidelines that Managarm follows. Specifically, we list the guidelines for which Managarm is likely to diverge from other projects. Please read them carefully before preparing a pull request.
- Data types are
CamelCase. - Variable names are
camelCase. - Private members use a trailing underscore, like
privateMember_. - Indentation uses tabs.
- Braces are placed similarly to existing code.
- Single line bodies of
if,while,forall go to a seperate line, like
if(expression)
	one-line statement;
- All headers have include guards. We use
#pragma oncefor all headers with the exception of public headers inmlibc, which uses the classical include guards. - Preferred line limit is 100 characters.
Additional Guidelines
The coding style guidelines in this section are mostly well-established; we list them for completeness and to assist new contributors.
Entity Naming
- Constants shall begin with an upper case letter, shall be upper case and words shall be separated by an underscore, like so
THIS_IS_A_CONSTANT. - Macros shall begin with an upper case letter, shall be upper case and words shall be separated by an underscore, like so
THIS_IS_A_MACRO.
Names
- Use sensible, descriptive names.
- Only use English names.
- Variables with a large scope shall have long names, variables with a small scope can have short names.
- Use namespaces for identifiers declared in different modules.
- Use name prefixes for identifiers declared in different modules.
Indentation and Spacing
- Each statement shall be placed on a line on its own.
- Pointers and references shall be declared like
T *xandT &x. - The
constkeyword shall be used likeconst int. - In a
switchstatement, cases shall be indented relative to theswitchstatement.
Example:
switch(condition) {
	case 1:
		code;
		break;
	case 2:
		code;
		break;
	default:
		break;
}
Classesand their access modifiers shall be indented on the same level.- A
structis preferred overclass X { public. - All binary arithmetic, bitwise and assignment operators and the ternary conditional operator (?:) shall be surrounded by spaces; the comma operator shall be followed by a space but not preceded; all other operators shall not be used with spaces.
- Braces shall follow "K&R Bracing Style variant One True Bracing". The K&R Bracing Style was first introduced in The C Programming Language by Brian Kernighan and Dennis Ritchie.
The opening brace is placed at the end of the enclosing statement and the closing brace is on a line on its own lined up with the enclosing statement. Statements and declaration between the braces are indented relative to the enclosing statement.
Example:
int main(int argc, char *argv[]) {
	printf("Hello!\n");
	for(int i = 0; i < 10; i++ ) {
		printf("The value of i: %d\n", i);
		if(i == 3) {
			printf("Hey, i is 3!\n");
		}
	}
}
Comments
- Comments shall be written in english
- If the purpose of a class or function cannot easily be recognized from its name, the class or function shall be preceded by a comment describing its purpose.
- Multiline comments shall use the C-style. Be consistent and use the
/* ... */style for multiline comments. - Single line comments shall use the C++-style. Be consistent and use the
// ...style for single line comments. - Use JavaDoc style comments for Doxygen. The comment styles
///and/** ... */are used by JavaDoc, Doxygen and some other code documenting tools. - All comments shall be placed above the line the comment describes, indented identically.
Files
- File name shall be treated as case sensitive.
- File names shall be lower case, shall not contain spaces and shall use dashes (
-) and not underscores as a word seperator. - C source files shall have extension ".c".
- C header files shall have extension ".h".
- C++ source files shall have extension ".cpp".
- C++ header files shall have extension ".hpp".
- Header files must have include guards.
The include guard protects against the header file being included multiple times. We use
#pragma oncefor all headers. Exception: public headers inmlibchave include guards. - The name of the macro used in the include guard shall have the same name as the file (excluding the extension) followed by the suffix "_H".
- All headers shall be included with <> Exception: In programs or libraries that consist of only a single source directory, private headers shall be included with ""
- Put #include directives at the top of files. Having all #include directives in one place makes it easy to find them.
Declarations
- Declare class data private. Classes shall encapsulate their data and only provide access to this data by member functions to ensure that data in class objects are consistent.
The exception to the rule is C type struct that only contains data members.
Statements
- Use gotos only in special circumstances.
One possible use of gotos are try-again loops where
whileorforloops would obscure the structure of the code.
Example:
tryAgain:
    [...]
    if(!foo.compare_exchange(/* ... */))
        goto tryAgain;
- All switch statements shall have a default label. Even if there is no action for the default label, it shall be included to show that the programmer has considered values not covered by case labels. If the case labels cover all possibilities, it is useful to put an assertion there to document the fact that it is impossible to get here. An assertion also protects from a future situation where a new possibility is introduced by mistake.
Semantics
- Use plenty of assertions. Assertions are useful to verify pre-conditions, post-conditions and any other conditions that should never happen. Pre-conditions are useful to verify that functions are called with valid arguments. They are also useful as documentation of what argument value ranges a function is designed to work with. However, we do not use assertions for user controlled input.
Assertions are macros that print error messages when the condition is not met. The macros are disabled in release mode and do not cost anything in performance or used memory in the end product.
Example: This square root function is only designed to work with positive numbers.
#include <assert.h>

double sqrt(double x) {
    // precondition: x is positive
    assert(x > 0);
    double result;
    ...
    // postcondition: result^2 ~= x
    assert(abs(result * result - x) / x < 1E-8) ;
}
Attribution
This guide is based on the Coding Standard Generator. Make your own!
Policy on AI use
Managarm requires contributions such as PR submissions and reviews to be made by a human. However, you can use AI tools (and other tools) during development provided that you follow the guidelines in this policy.
- There must always be a human in the loop. This person (and not an AI system) is considered to be the contributor. As a consequence, we do not allow contributions (code or otherwise) from fully automated systems (such as bots that post or review pull requests). Additionally, all code must receive a human review before it is merged.
- All submissions are subject to the same quality expectations. AI generated code must be manually reviewed by the contributor before it is posted as a pull request. Contributors are expected to understand their contributions, to be able to respond to review questions and to fix issues raised during review.
- As with any other submission, contributors must ensure that AI generated code does not violate copyright laws. In particular, if AI code generators are used, contributors must check that the AI does not reproduce variations of copyrighted code from the AI's training set. We discourage the use of AI (at least without additional guidance) to implement larger subsystems from scratch for this reason. Other uses of AI such as refactoring or using it to fill out gaps in a hand-written skeleton implementation are less likely to run into copyright issues. While the current consensus seems to be that AI generated code is not copyrightable as long as it is not closely related to the AI's training data, legal changes may require us to update this requirement (even retroactively).
- Contributors are encouraged to add
Assisted-by:tags (as used by the Linux kernel) to indicate whether specific tools where used during development.
References: this policy is loosely based on the LLVM AI tool use policy (in its version corresponding to LLVM commit 61a58cfa).
Using Wireshark to dissect bragi messages
Managarm offers the possibility of dumping some protocols for inspection with Wireshark.
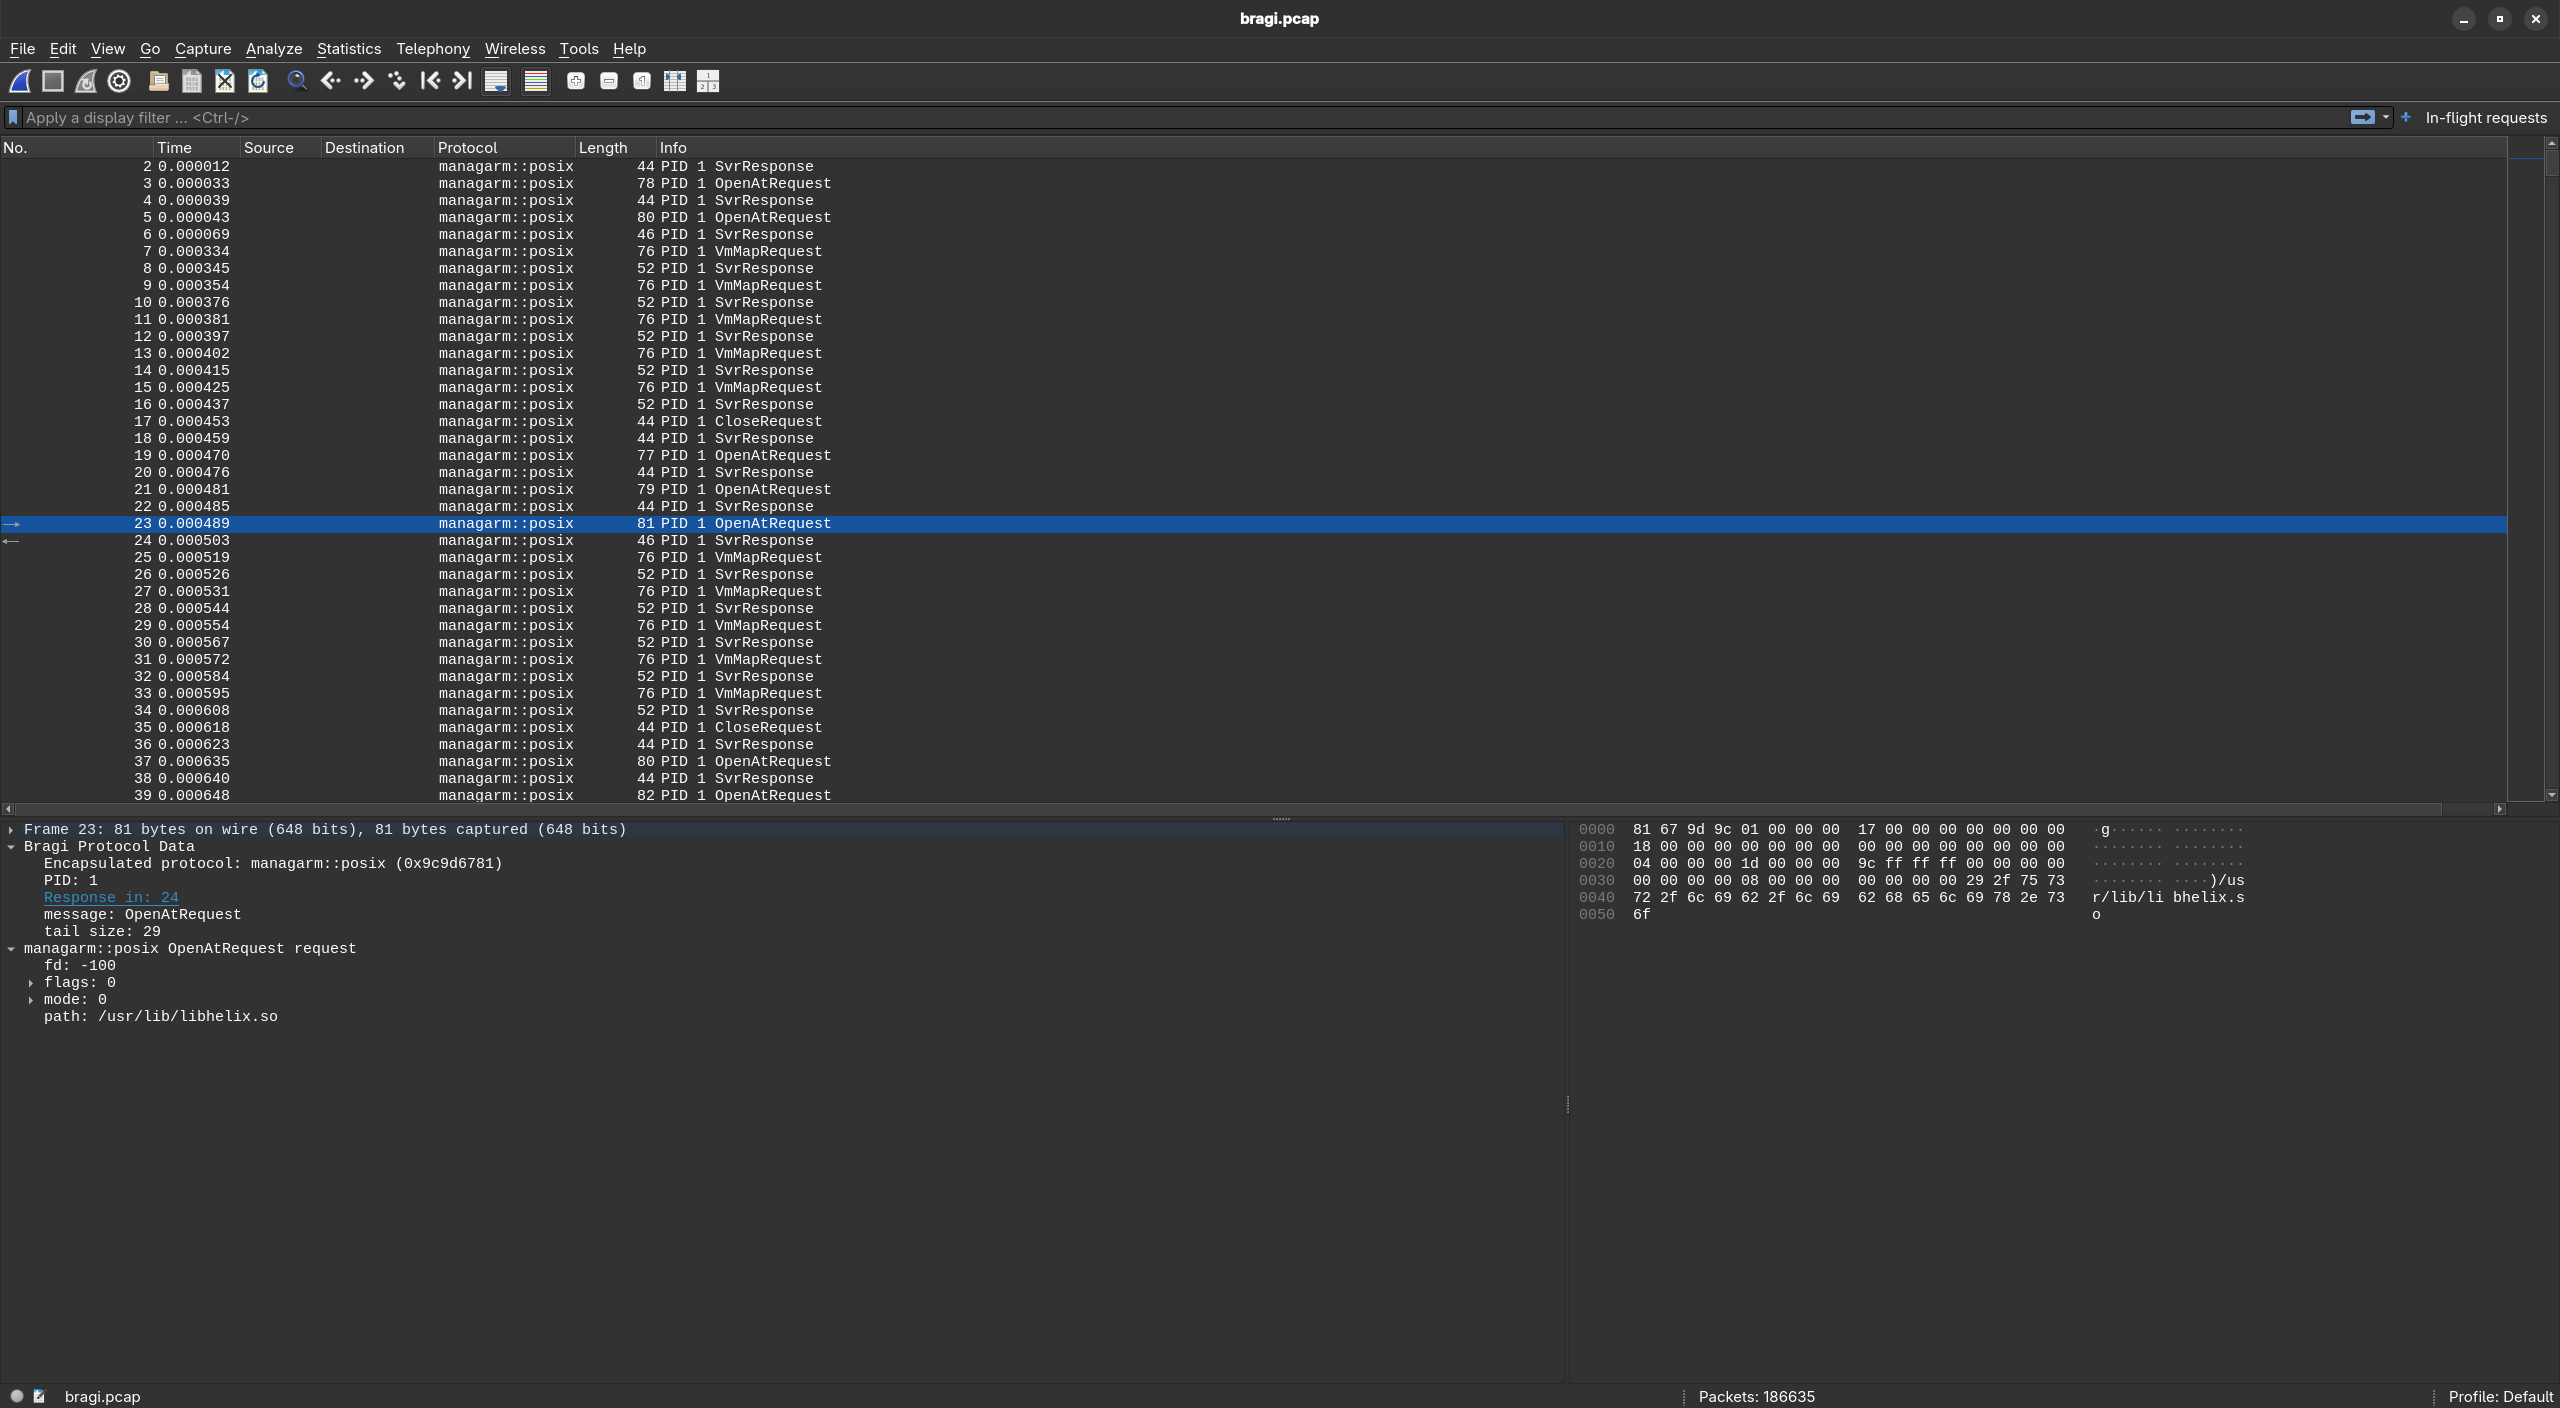
Setting it up
Bragi can generate the Wireshark dissector with a command like:
bragi -o bragi.lua ../src/managarm/protocols/posix/posix.bragi ../src/managarm/protocols/fs/fs.bragi wireshark
This command is the currently recommended way, as other protocols are currently not dumped. This generates the Wireshark Lua dissector at bragi.lua, which needs to be placed under ~/.local/lib/wireshark/plugins/, either by copying the file or symlinking. Make sure that your Wireshark has Lua dissector support enabled. The bragi dissector should be rebuilt after every change to one of the passed bragi protocols. Reloading the Lua file in Wireshark can then be done with Ctrl+Shift+L.
Dumps are collected over ostrace if it has been enabled with the ostrace kernel cmdline. This will generate a ostrace.bin in your build directory. A Wireshark-usable pcap file can then be generated with the following command:
xbstrap run generate-pcap
This will result in a bragi.pcap file that can be opened with Wireshark.
Analyzing the dump with Wireshark
All packets in the pcap include a header that contains some metadata about the bragi message. The details of that can be seen under the Bragi Protocol Data foldable section in the dissector window. Below that, protocol-specific decoding of the messages follows.
For diagnosing hangs, it can be useful to get a view of all in-flight requests. For convenience, this can be roughly filtered with the following expression:
!bragi.reply_to && !bragi.request_of && !fs_ioctlrequest && !fs_initializeposixlane && !posix_netserverrequest
This can be saved as a filter, as can be seen in the screenshot above.
Hardware CI
Managarm has some infrastructure to automate testing of Managarm builds.
Using hwci
⚠️ Note that access to Managarm's
hwcirequires your SSH public key to be added to our list of trusted users.
To use the hardware CI, you need:
- Access permissions (see above).
- A Managarm system root (see the build instructions).
- The base system installed to the system root (
xbstrap install base). - Packages installed that are required the desired device.
This may include
boot-artifactsandvendor-devicetrees(xbstrap install boot-artifacts vendor-devicetree). The Raspberry Pi also requiresraspberrypi-firmware.
Setting up hwci is done as follows:
-
Install
hwciinto a Python virtual environment. A convenient location for this may be the Managarm build tree.python3 -m venv venv ./venv/bin/pip3 install git+https://github.com/managarm/managarm-hwci.gitAlternatively,
hwcimay be installed viapipxor other Python package managers. Note that updatinghwcifrom Git may require--force-reinstallforpip3if the package version did not change since the last previous update. -
hwcirequires ahwci.tomlconfiguration file in the directory that you run it from. The following configuration file gives access to thebpi-f3andrpi4devices.# The SSH key listed here must correspond to the public key that you use for authentication: ssh_identity_file = "~/.ssh/id_rsa" [repositories] aarch64-latest = "https://builds.managarm.org/projects/managarm_aarch64/success/repo/packages/aarch64/" riscv64-latest = "https://builds.managarm.org/projects/managarm_riscv64/success/repo/packages/riscv64/" [presets.rpi4] arch = "aarch64" repository = "aarch64-latest" packages = [ ] # We do not want to build from repositories. profile = "raspi4" # Profile for gen-boot-artifacts.py. [presets.bpi-f3] arch = "riscv64" repository = "riscv64-latest" packages = [ ] # We do not want to build from repositories. profile = "bpi-f3" # Profile for gen-boot-artifacts.py. -
Finally, you can launch a run on one of the machines by running
./venv/bin/python3 -m hwci --relay https://hwci.managarm.org/relay -d rpi4 --sysroot system-root/ --timeout 300Here
system-root/is the path to your Managarm system root (for the same architecture as the device).
Setting up a hardware CI target
This section documents how to attach new devices to the hardware CI.
Requirements
Hardware requirements.
- One or more devices that should be made available via hardware CI. In the following we call these devices as opposed to the target server (see below).
- A Linux machine that acts as the target server.
- Some way to turn the devices on and off. For example, this can be achieved via smart sockets, a NanoKVM connected to the device's ATX power button and LED, etc.
- Serial connections between the target server and the devices (e.g., a USB-to-serial adapter connected to the device).
- Network connectivity between the target server and devices to enable PXE or TFTP boot.
Software requirements.
- A WireGuard connection between the relay (
https://hwci.managarm.org/) and the target server. Setting this up requires coordination with our infrastructure. - A TFTP daemon on the target server (e.g.,
tftp-hpa). - Enough disk space on the target server to store the disk image of all devices. Around 10 GiB per device should cover all use cases.
- Optionally, for faster snapshots of image files: a reflink-capable partition (e.g.,
btrfsorxfs) for the TFTP and image files.
Device installation.
- For each device, create a directory for the TFTP files. This should be a subdirectory of the
TFTP daemon's directory (e.g., if the TFTP daemon serves
/srv/tftp/, each device should have a subdirectory in/srv/tftp/).- Note that some devices have specific requirements on what their TFTP directories should be named like. For example: by default, the Raspberry Pi 4 searches for a TFTP directory that matches its serial number.
- Devices that use proper PXE should not have such requirements.
- When using DHCP, set up your DHCP server for PXE or TFTP boot of each device.
- Ensure that PXE or TFTP boot works for each device.
How exactly this is done varies by device.
- For example U-Boot can usually just boot using the
dhcportftpcommands.
- For example U-Boot can usually just boot using the
Installation on the target server.
- The target server needs a user and group (e.g., called
hwci) to run the target server daemon.- The
hwciuser must have access to thedialoutgroup (otherwise the daemon cannot access the serial device that connects the target server and devices). - Additionally, the
hwciuser must have write access to the per-device TFTP directories (but not to the TFTP daemon's root directory).
- The
- Install
hwciinto a virtual environment on the target server:sudo python3 -m venv /usr/local/lib/hwci/venv sudo /usr/local/lib/hwci/venv/pip3 install git+https://github.com/managarm/managarm-hwci.git - Create a state directory
/var/local/hwcithat is owned by thehwciuser and group. - Create a configuration file
/var/local/hwci/target.tomlfor the target server daemon.[devices.rpi4] tftp = "/srv/tftp/2026eece" uart = "/dev/ttyUSB0" switch = {"shelly" = "http://shelly-switch-a.local"} [devices.bpi-f3] tftp = "/srv/tftp/bpi-f3" uart = "/dev/ttyUSB1" switch = {"shelly" = "http://shelly-switch-b.local"} - Create a systemd service file
/usr/local/lib/systemd/system/hwci-target.service(with10.0.70.2replaced by the actual WireGuard IP)[Service] Type=simple ExecStart=/usr/local/lib/hwci/venv/bin/python3 -m hwci.target --address 10.0.70.2 WorkingDirectory=/var/local/hwci User=hwci Group=hwci - Enable and start
hwci-target.serviceviasystemctl.
The Design of Managarm
This section of the Guide is Work-In-Progress. Please come back later for more information.
The Design of Managarm
This section of the Guide is Work-In-Progress. Please come back later for more information.
The Design of Managarm
This section of the Guide is Work-In-Progress. Please come back later for more information.
Hel and Helix
This part of the Handbook if Work-In-Progress.
Hel and Helix is the syscall API for Managarm. Hel is the C API and Helix is C++ wrapper for some parts of Hel.
Doxygen Generated API Reference
The generated Documentation for managarm/hel can be found at https://docs.managarm.org/hel-api
thor and eir
This part of the handbook is Work-In-Progress.
thor and eir are the kernel of Managarm.
eir
eir is the platform-dependant part of Managarm's kernel which hands over control to thor after setup. This pre-kernel takes over from the boot manager/loader and manages the boot protocol specific aspects in order to allow for the thor handoff to be generic. Various setup functions are performed, like getting a memory map, setting up a framebuffer and loading the initrd. thor is loaded from the initrd, as some boot protocols do not support passing more than a single module. After some architecture specific setup, page table setup and similar steps, the handoff info structure EirInfo is filled with information. After this, eir jumps to thor.
thor
thor then proceeds to initialize the memory subsystem, scans and initializes PCI devices, starts the ACPI subsystem and starts the base servers and supporting infrastructure needed to run Managarm's userland. This means that the following programs are started (in order).
- mbus, which is used to allow servers to find each other.
- kerncfg, which exposes kernel configuration to servers.
- srvctl, controls the starting and stopping of servers.
- kernletcc, can compile and upload small programs (written in lewis) that run in kernel space.
- clocktracker, provides timekeeping services to servers.
- posix-subsystem, which runs posix-init, which is Managarm's init, and provides the environment that is expected by POSIX programs.
After starting the initial userspace, thor enters normal operations and handles system calls. The code for thor and eir can found at https://github.com/managarm/managarm/tree/master/kernel.
frigg
This part of the handbook is Work-In-Progress.
frigg is a lightweight utility library for system programming written in C++.
frigg has implementations for many frequently used constructs in C++, like vectors, arrays and lists. It also implements memory allocators, utilities for error handling (frg::expected), and logging utilities. In contrast to the C++ standard library, it is entirely freestanding and does not depend on functionality provided by the host. Hence, frigg is used extensively in the Managarm kernel and in mlibc.
The code for frigg can found at https://github.com/managarm/frigg.
libasync
This part of the handbook is Work-In-Progress.
libasync is a support library for supporting C++20 coroutines and C++ senders/receivers. It also provides many asynchronous primitives (e.g., asynchronous events, queues and mutexes). Managarm, being an asynchronous operating system, makes extensive use of the functionality provided by libasync.
The code for libasync can be found at https://github.com/managarm/libasync.
mbus
This part of the Handbook is Work-In-Progress.
mbus is the managarm message bus system. mbus is used by servers to publish objects, which other servers can discover. If a server finds an object of interest, it can then use mbus to connect to that server. Further communication happens over the more common hel streams documented in the hel folder of this handbook.
The code for mbus can be found at https://github.com/managarm/managarm/tree/master/mbus.
bragi
This part of the Handbook if Work-In-Progress.
bragi is the future interface definition language for use in Managarm.
The code for bragi can be found at https://github.com/managarm/bragi.
Requirements
bragi requires python3 and lark-parser.
Sample code
enum enum1 {
	foo = 1,
	bar,
	baz
}

message msg1 1 {
head(256):
	byte[64] bab;
	byte[64] bib;

tail:
	optional tag(13) byte[3] bub = [1,2,3];
	optional byte[] beb = [7];
	string bob = "test";
}

message msg2 2 {
head(128):
	optional byte[64] bab;
	int32 bib = 2345;

tail:
	byte[4] bub = [1,2,3];
	byte beb = 7;
	byte bhb = 7;
	string bob = "test";
}

message msg3 3 {head(13): byte foo = 3;}

message msg4 4 {
head(64):
	uint64 foo;
	byte[16] arr;
tail:
	int32 baz;
	uint32[] bif;
}
Compile the sample code
To compile the sample.idl sample code run:
python setup.py install
bragi
posix subsystem
This part of the Handbook is Work-In-Progress.
The posix subsystem is the core of Managarm's userspace. It is started by thor and handles all posix requests made by userspace programs, like file I/O, memory allocation and sockets. It also implements various Linux API's like epollfd, signalfd, timerfd and inotify. For file I/O on block devices, it communicates with libblockfs, which is responsible for the actual file I/O on ext2 file systems.
On startup, the subsystem runs posix-init, which is a two stage init responsible for bringing up the userland. Thus, posix-init does the following operations:
- Starting of several servers for storage, this includes the USB host controller drivers (
ehci,uhciandxhci) and the block devices (virtio-blockandata). - Mounting of the root (
/) file system and the various pseudo file systems (procfs,sysfs,devtmpfs,tmpfsanddevpts) and entering it viachroot. - Executing stage 2, which brings up the rest of the userspace
In stage 2, the following operations take place
- Starting of
udevd, which is responsible for populating/devand starting of other servers via udev rules. - Starting of drivers that are not yet integrated in udev rules.
- Ensuring that the
Direct Rendering Manager (drm), keyboard and mouse are available. - Parsing the kernel command line for hints on what userspace program to run.
- Populating the environment with essential variables.
- Either launching
westonwithXWaylandsupport,swayorkmscon, as requested.
Afterwards, init goes to sleep and the userspace is operational.
The code for the posix subsystem can be found at https://github.com/managarm/managarm/tree/master/posix/subsystem, while the code for posix-init can be found at https://github.com/managarm/managarm/tree/master/posix/init.
servers
This part of the Handbook is Work-In-Progress.
Servers are how most drivers running on a managarm system should be implemented. Exceptions to that are drivers that are required for kernel functionality, for instance interrupt controllers, which are part of the kernel. e9 debug logging is also implemented in-kernel. Notably, ACPI handling is also done in-kernel - having this run in a server has previously proved overly complex, and some functionality is needed by the kernel to set up timers and interrupts anyways.
As (filesystem) servers are used to access file systems, we cannot rely on loading servers from a disk - they are loaded from the initrd for bootstrapping. This is necessary for at least all servers that can be used for file access, and their dependencies.
Other servers can be loaded from regular file systems, but they will run in the same initrd environment, which notably does not execute under the control of posix-subsystem. As these servers may rely on shared objects that are not part of the initrd, they are uploaded by runsvr as needed. The YAML recipes used by bakesvr provide the file list.
Launching
Servers needed for bootstrapping are launched from stage1 (posix/init/src/stage1.cpp). After this, posix-subsystem sets up the environment by mounting the rootfs, setting up mounted filesystems like procfs, sysfs, and others. Once udev is launched, our udev rules are evaluated. These use runsvr to bind devices to servers (via the svrctl protocol) or launch servers. USB udev rules are located under drivers/usb/90-managarm-usb.rules, and similar rules exist for NICs and graphics.
Managarm drivers
This section of the Guide is Work-In-Progress. Please come back later for more information.
libblockfs
This part of the Handbook is Work-In-Progress.
libblockfs is a support library in Managarm responsible for handling file I/O on block devices like hard drives and USB. It is a general interface to the underlying file systems that are available in Managarm. Userspace programs do not call libblockfs directly, but request functionality through the posix subsystem.
The code for libblockfs can be found at https://github.com/managarm/managarm/tree/master/drivers/libblockfs.
Implementation Notes
This chapter contains notes on various implementation details of the Managarm operating system.
Drivers
This section describes the overall design of drivers in Managarm and gives guidelines and recommendations for authors of new drivers.
IRQ Handling
IRQ handling is one of the most tricky parts in a driver. Handling IRQs incorrectly can not only render the driver unusable but also impact the functionality of other drivers that share the same hardware IRQ line.
General IRQ handling strategy
Handling an IRQ in your driver generally involves the following steps:
-
Wait for an IRQ (using
helix_ng::awaitEvent()). -
Determine if the IRQ was triggered by your device (and not by some other device that shares the same IRQ line). This usually requires reading some interrupt status register ("ISR").
IRQs that are indeed caused by your device will need to be ACKed at a later step, IRQs that were caused by other devices that share the same IRQ line need to be NACKed.
-
Instruct the hardware to clear the IRQ.
For level-triggered IRQs, this will de-assert the IRQ (i.e., cause it not be be fired immediately again). For edge-triggered IRQs, this step usually re-enables the hardware device to issue an edge once a new (device-specific) event occurs.
-
ACK or NACK the IRQ (using
helAcknowledgeIrq()with appropriate flags). -
Depending on the device: do further processing. For example, some hardware devices will require you to inspect ring buffers to collect the requests that were finished by the device.
The order of these steps is significant: determining if the IRQ was caused by your device only makes sense after an IRQ occurred, and you cannot ACK/NACK without knowing whether the IRQ was caused by your device. Furthermore, not following the above order can lead to subtle bugs; hence, drivers should always stick to this order (see below for additional justification in the case of level-triggered IRQs).
Kernel behavior
The following rules form the basis of the guidelines for drivers below.
The kernel handles IRQs in a strictly sequenced way: when an IRQ line is raised, the kernel marks the IRQ as "in-service" and invokes all IRQ handlers (i.e., IRQ descriptors used by drivers, as well as in-kernel IRQ handlers). While the IRQ is in-service, IRQ handlers (of the same IRQ line) will not be invoked again. The kernel resets the in-service status only after all IRQ handlers (i.e., all drivers) have either ACKed or NACKed the IRQ.
If all drivers NACK an IRQ, the kernel will stall the IRQ line. More precisely, it will mask the line, preventing further IRQs from being raised. This mechanism protects against "IRQ storms", i.e., recurring IRQs that block overall system progress since the system does not know how to handle them. Drivers need to take care to not accidentially cause a stall.
Guidelines for drivers and potential pitfalls
To avoid stalls, drivers should take the following constraints into consideration:
-
A driver must avoid to clear IRQs that the kernel did not deliver to the driver yet. Clearing an IRQ that was not delivered yet causes the IRQ to not be recognized by any device; that is, it causes the IRQ to become "spurious".
If spurious IRQs cannot be avoided (e.g., because a device might assert and then clear its IRQs during a hardware reset), drivers must call
kHelAcknowledge()with thekHelAckKickflag. Failing to "kick" the spurious IRQ usually lead to all drivers NACKing the IRQ (and hence stall the IRQ line). -
"Wrong ACK": ACKing an IRQ that was not actually caused by the device in question is not harmful as long as it happens only rarely: if another driver that shares the IRQ line also ACKs, the wrong ACK does not impact system-wide IRQ behavior. Otherwise, if all other drivers NACK, the ACK causes the IRQ temporarily to not be stalled.
-
"Wrong NACK": the reverse, namely NACKing an IRQ that actually came from the driver's corresponding device is problematic since it can cause stalls (if all other drivers NACK).
-
After obtaining a handle to an IRQ descriptor, a driver must handle IRQs in a timely manner. Keeping IRQs in-service for extended periods of time can delay other drivers that share the same IRQ line.
- Handling an IRQ by a kernlet requires special attention during initialization:
if an IRQ is currently in-service, attaching a kernlet does not
immediately run the kernlet. Thus, if a driver wants to handle IRQs exclusively
through the use of kernlets, the IRQ must potentially be ACKed after
installing the kernlet. This can be achieved by using
helAcknowledgeIrq()with thekHelAckKick | kHelAckClearflags (which is not harmful since it is equivalent to a wrong ACK).
Considerations for level-triggered IRQs:
- Level-triggered IRQs must always clear an IRQ before ACKing it (see above). ACKing a level-triggered IRQ before clearing will cause the IRQ to be re-raised immediately. Clearing the IRQ after the re-raise may cause the IRQ to be become spurious (and thus stall the IRQ line).
Considerations for edge-triggered IRQs:
-
The kernel will buffer (a single) IRQ if an edge happens while an edge-triggered IRQ is still in-service. This ensures that IRQs that occur after clearing the ISR but before ACKing are handled correctly.
-
Spurious IRQs are problematic for edge-triggered IRQs: similarly to level-triggered IRQs, drivers will NACK spurious IRQs and thus to stall the IRQ line. This is not an issue for devices that do not re-issue edges until the ISR register is cleared yet. However, various legacy devices (such as the
x86's keyboard controller) have no ISR register. If these devices are not on shared IRQ lines, they can simply always ACK all IRQs to avoid stalls.
Implementation Notes: Thor
This section discusses various implementation details of Managarm's kernel.
Initialization
Thor's initialization consists of multiple stages:
-
Early initialization (in
thorInitialize()). This stage performs rudimentary initialization of the system to enable the use of basic kernel infrastructure. Since it runs before global constructors, code in this stage cannot use global variables unless they areconstinitor defined as static singletons inside functions.The early initialization stage is split into the following steps:
-
Initialization of basic features the CPU architecture (in
initializeArchitecture()). Among other (architecture-dependent) things, this step initializes access to CPU-local data (viagetCpuData()). -
Initialization of debug sinks and loggers. This is done early such that other initialization code can use Thor's usual logging infrastructure (including
infoLogger()andpanicLogger()). -
Initialization of the memory management subsystem.
-
-
Running global constructors. This stage runs global C++ constructors. Among other things, global constructors are used to build the initgraph data structure that is used in the next stage.
-
Running the so-called initgraph (in
thorMain()). The initgraph is a data structure that consists of tasks and dependencies between tasks. Tasks can define both dependencies and reverse dependencies; this way, the initgraph can easily be used to express dependencies between generic and subsystem-specific tasks.Thor does not run the entire initgraph at once; instead, the initgraph is split into multiple milestones:
-
Reaching the
tasking-availablemilestone. Early tasks of the initgraph run directly inthorMain, before multi-tasking or IRQ support is available. -
Running the remaining initgraph on a kernel fiber. Once the
tasking-availablemilestone is reached, Thor enters multi-tasking mode and runs the remanining tasks of the initgraph in a fiber (= kernel thread).Since IRQ support is not available before
tasking-availableis reached, all tasks that depend on IRQs must depend (directly or indirectly) ontasking-available.
-
Scheduling
Theory
We first develop the theoretical model that Managarm's scheduling heuristic is based on. Even though our goal is to work with discrete time slices, it will be beneficial to imagine that time slices can arbitrarily be split up into smaller sub-slices.
Let:
- \(s_i\) be the length of the \(i\)-th time slice,
- \(n_i\) be the number of threads that are schedulable in time slice \(i\) (i.e., threads that are either running or runnable, but not blocking),
- \(\alpha_i(t)\) be 1 if thread \(t\) is schedulable in time slice \(i\), and 0 otherwise,
- and let \(r_\ell(t)\) be the actual running time of thread \(t\) up to (and including) time slice \(\ell\).
Deciding which thread to run. From a fairness perspective, it would be ideal to run all \(n_i\) threads for time \(\frac{s_i}{n_i}\) in time slice \(i\) (i.e., it would be ideal to split up the time slice into \(n_i\) sub-slices). In reality, we can only run a single thread per time slice; however, we can still try to balance the running time of each thread such that it approaches the ideal scenario. For this purpse, Managarm defines the unfairness of thread \(t\) as:
\[ u_\ell(t) = \left( \sum_{i=0}^\ell \alpha_i(t) \frac{s_i}{n_i} \right) - r_\ell(t) \]
In our idealized scenario, we have \(u(t) = 0\) at all times: if we split the \(i\)-th time slice into \(n_i\) sub-slices of length \(\frac{s_i}{n_i}\) and let each thread run in exactly one of the sub-slices, then \(r_\ell(t)\) would exactly equal the sum of all \(\frac{s_i}{n_i}\). Thus, if \(u(t) < 0\) (respectively \(u(t) > 0\)), thread \(t\) has been active for longer (respectively shorter) than it would have been in the ideal scenario. Since \(u(t)\) decreases if thread \(t\) runs (and increases if a thread other than \(t\) runs), we always schedule the thread with the highest value of \(u(t)\).
Picking the length of a time slice. Our scheduling heuristic also has to pick the length of time slice \(s_\ell\). For this purpose, consider the thread \(t_0\) that runs in that time slice. We want to run \(t_0\) until \(u(t_1) \geq u(t_0)\), where \(t_1\) is the next best thread. While thread \(t_0\) runs, \(u(t_0)\) evolves as:
\[ u_\ell(t_0) = u_{\ell-1}(t_0) + \frac{s_\ell}{n_\ell} - s_\ell \]
on the other hand, \(u(t_1)\) is given by:
\[ u_\ell(t_1) = u_{\ell-1}(t_1) + \frac{s_\ell}{n_\ell} \]
Hence, \( u(t_1) - u(t_0) \geq 0 \Leftrightarrow s_\ell \geq u_{\ell - 1}(t_0) - u_{\ell - 1}(t_1) \) yields the length of our time slice. In practice, we want to avoid time slices that are too short and pick \( s_\ell \geq u_{\ell - 1}(t_0) - u_{\ell - 1}(t_1) + s_\textrm{gr} \), where \( s_\textrm{gr} \) is some granularity constant (e.g., 10 ms).